Quantcast
Channel: GNS3 Labs | CCNP | CCNA Labs
Viewing all 113 articles
Browse latest View live

Use Juniper router Image with GNS3 1.1 junOS with VortualBox

$
0
0

How to run juniper Router on GNS3 1.1 using VirtualBox:

This article is about the installation and configuration of juniper router on gns3 1.1. There are some ways for using Juniper router on GNS3, here i will discus one of them i.e. using VM junOS on GNS3.  

In this method we used a virtual machine of JunOS Olive (Juniper Image) for gns3 simulation. We need aJunOS Olive image VM (.ova filewhich you can download from this link. Once you have download this, you need to create a virtual machine using this .ova file in your virtual box and then you can use that VM in GNS3 for simulating juniper router.

1. Simply double click on this  .ova file that you have downloaded from above link or open this file using virtual-box and then click on import. You can change default setting before importing, for example you can change the RAM, VM name, Network adapter etc
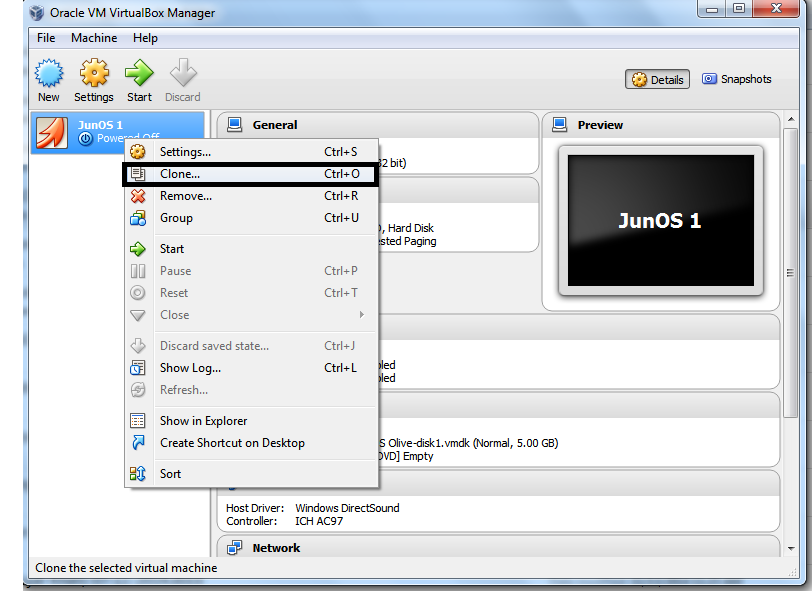
If you want to simulate more than one router in GNS3 then you need to create more than one copies of this JunOS VM instance or clone. For creating clone right click on  already created VM and then click on clone.

Then type the name for new clone or VM and select the checkbox "reinitialize the MAC address of all network cards"
In this way you can create multiple clone and can use multiple juniper router on gns3.
2. Now launch Gns3 and open the Edit\preferences, goto virtualbox setting and create a new VM on gns3 by clicking on New. select the junOS VM from menu that we have created in step-1 and click on finish and then on OK.

For using multiple juniper router you need to create multiple router VM  in gns3 using above method. For simulating three juniper router you need three VirtualBox VMs in Gns3. 

3. This juniper router VM will appear in end device menu of gns3.

You can set number of interfaces for this JunOS VM, for this drag VM on gns3 dashboard and then right click on it, click on configure and from network tab set the number of adapters or choose the interface type.
Now start the VM by right click on device and then on start, for configuration right click on it and then console. If you have any issue with the console then you can use the virtualBox console. User name is root for this junOS VM.

You can also change it PC symbol to router from change symbol.


Watch a Video:


Download and Run juniper router (junOS image...by Waqasgk

How to Email/upload .exe with gmail | Blocked for security reasons!

$
0
0

How to upload an executable and others files those are Blocked for security reasons using Gmail:

As a security reason to save you from viruses and from other malicious software Gmail has blocked  to send or receive  .exe files. Similarly you can't send zip file having executable files or .rar file within a .rar or zip file.
wherever you upload such file you get the message "Blocked for security reasons! "

If you need to email an executable file (.exe) and you know that this is not a harmful file, you can send it by following method.

On windows 8:

Step 1-Show file extensions: If your operating system is windows 8 then open the folder that have the exe file which you want to email. Then from view tab check the checkbox "file name extensions ". this will show file extensions.


Step 2-rename file and remove extension: now right click on file and rename, remove .exe from it.
Windows will confirm from you click on yes.


Now you have an unrecognized file, you can attach this to gmail easily without any error message and receiver of this email can use this file by adding .exe extension using above method.


On windows 7:
On windows 7 you can send the executable file with same method but showing file extensions is a little different. You can show the file extensions on windows 7 by following steps:

Open the organize\folder and search option from file explore.

and then from view tab unclear the checkbox "hide extensions for known files' and click on OK.


now remove the .exe extension from file. In this way you can email an executable file using gmail.

Juniper error missing mandatory statement 'root-authentication' | requie change of case, digit or punctuation

$
0
0

error: comit failed: (missing statements) Commit command is not working | how to save running configuration on juniper in gns3:

Error Message detail:
Junos version= JunOS Olive 12.1R1.9
error messge= missing mandatory statement 'root-authentication'
error image=

The reason or causes of this error:
  juniper router running JunOs have the default user name "root" with not password. Whenever you want to commit or save some changes/configuration using commit command& no password is set for root user then it will show you the above error that is "missing mandatory statement 'root-authentication'"

How to save current configuration on Juniper:

In order to commit change or for saving current configuration on juniper router you have to set the root password. You can set the root password on juniper router with following commands:

cli
configure

set system root-authentication plain-text-password (press enter)
now type the root password and press enter. Remember you are required to set a strong password with alpha numeric characters otherwise it will show you error messages
error: minimum password length is 6
error: requie change of case, digit or punctuation 
 and you will need another try with a password having letters and numbers..


once you have  successfully set root password, now you will able to save the current configurations & your commit command will also works fine. If you want learn more about configuration of juniper on gns3


How to Configure Static routing on juniper router in gns3

$
0
0

Junos static route configuration:

In this article i will show you how to configure static routing with junier router on gns3. For configuring static routing you need to define the route as static and with a next-hop address with it. 


Please note this lab is performed only for study and practice purposes using Junos olive , which is unsupported and unsupportable platform & it is not suitable for any type of commercial use.
Lab Requirements
You have three juniper routers connected with each other, you have the following tasks to perform:
  • Configure all the interfaces with right IP address (According to figure)
  • Configure static routes between all routers so that they can communicate with each other.
Other Detail:
Junos image versionJunOS Olive image 12.1 
Gns3 version= Gns3 1.1 (you can use any version)
VM VirtualBox version=  4.2.4 (you can use any version)

Set IP addresses of all interfaces of juniper router:

For setting ip address of interface you need the following commands.

JunOs2 configuration:
login: root
root@% Cli
root> configure
[edit]
root # set interfaces em0 unit 0 family inet address 172.16.1.1/24

You can also configure some loopback with these commands:

root # set interfaces lo0 unit 55 family inet address 111.0.0.1/32
root # commit

Having issue with commit command visit missing mandatory statement'root-authentication'


JunOs3 configuration:
Cli
edit interfaces
set interfaces em0 unit 0 family inet address 172.16.1.2/24
set interfaces em1 unit 0 family inet address 192.168.1.1/24
commit

JunOs4 configuration:
Cli
edit interfaces
set interfaces em0 unit 0 family inet address 192.168.1.2/24

You can also configure some loopback with these commands:

set interfaces lo0 unit 55 family inet address 222.0.0.1/32

commit

Configure static routing on Juniper routers:

For configuration of static routing you need next hope addresses:
Static routing on JunOs2 
On junos2 111.0.0.1/32 and 172.16.1.0/24 are directly connected networks whereas 192.168.1.1/24 and 222.0.0.1/32 are remote or destination networks and inaccessible from junos2 . You need to configure static routes for making these routes accessible on junos2. Nex-hop address is 172.16.1.2 for all these routes.         

Cli
Edit routing-options
set routing-options static route 192.168.1.0/24 next-hop 172.16.1.2
set routing-options static route 222.0.0.0/32 next-hop 172.16.1.2

Static routing on JunOs3
111.0.0.1/32 and 222.0.0.1/32 are inaccessible networks on junos3 and need static routes. Nex-hop addresses are 172.16.1.1 for 111.0.0.1/32 and 192.168.1.2 for 222.0.0.1/32.

Cli
Edit routing-options
set routing-options static route 222.0.0.0/32 next-hop 172.16.1.1
set routing-options static route 111.0.0.0/32 next-hop 192.168.1.2

Static routing on JunOs4
Nex-hop address for all routes on junos4 is 192.168.1.1.          

Cli
Edit routing-options
set routing-options static route 172.16.1.0/24 next-hop 192.168.1.1
set routing-options static route 111.0.0.0/32 next-hop 192.168.1.1

Testing:
You can verify your configurations with following results:

Ping from junos2 to 222.0.0.1 should be successful.


Show route brief on JunOS 4 will have following output 


How to Configure RIP on Juniper in GNS3 1.1

$
0
0

Run Routing Information Protocol on JunOS 12.1 in GNS3:

In this article i will show you how to run the RIP (Routing Information Protocol) among juniper routers. when you configure the RIP on junos by default it will enable RIP v2 & this is one of the difference from Cisco where you need to configure version2 manually.
I have simulated this lab on gns3 which is one famous network simulator. For juniper simulation i have used junos olive only for study purpose and junos olive is not suitable for any type of commercial use. Gns3 Labs detail are as mention below but you can use any versions of these software.

Gns3 version= Gns3 1.1
Junos version=  JunOS Olive 12.1 VM image
VM VirtualBox version=  4.2.4 

If you want learn more about the configuration of junos in gns3 you can visit how to configure junos on gns3.


Lab Requirements:
There are three Junos routers in given topology which are connected with each other and already configured with correct IP addresses according to topology. If you want to explore how to configure IP addresses to JunOS interfaces you can visit IP & static routing on JunOS. We have the following task for this Gns3 Lab:

  • Configure RIP routing protocol on all these routers


Explanation:
Configuration of RIP on junOS is very simple, you need only few commands and then good to go..:).
By default JunOS don't advertise RIP routes & the routes received from neighbors, so we need to define a routing policy for advertisement of RIP routes.

Configuration of RIP on JunOS2:  

You can start configuring JunOS2 in following way.

login: root
root@% Cli
root > configure
[edit]
root # set protocols rip group rip-routes neighbor em0 

where rip-routes is the group name, which you can set it of own choice and em0 is the connected interface of Junos2.

root #set policy-options policy-statement advertise-RIProutes from protocol direct
root #set policy-options policy-statement advertise-RIProutes from protocol rip
root #set policy-options policy-statement advertise-RIProutes then accept

Where "advertise-RIProutes" is the name of policy. now you need to apply this policy with following command.
root # set protocols rip group rip-routes export advertise-RIProutes
root # commit
Useful link: how to save current configuration in junos.

RIP Configuration  on JunOS3: 

root
Cli
configure
set protocols rip group rip-routes neighbor em0 
set protocols rip group rip-routes neighbor em1

Set policy-options policy-statement advertise-RIProutes from protocol direct
set policy-options policy-statement advertise-RIProutes from protocol rip
set policy-options policy-statement advertise-RIProutes then accept
set protocols rip group rip-routes export advertise-RIProutes
 commit

RIP Configuration  on JunOS4: 

root
Cli
configure
set protocols rip group rip-routes neighbor em0

Set policy-options policy-statement advertise-RIProutes from protocol direct
set policy-options policy-statement advertise-RIProutes from protocol rip
set policy-options policy-statement advertise-RIProutes then accept
set protocols rip group rip-routes export advertise-RIProutes
 commit
How to verify configuration:

You can test your configuration by ping from junos2 to 222.0.0.1 which is a loopback address on junos4. Also "show route" will show all routes on all routers. An output of show route command will have the following routes:


RIP Configuration between Cisco and Juniper Routers on Gns3 1.1

$
0
0

How to Configure RIP among different vendor routers:

This article is about configuration of RIP routing protocol between Cisco and juniper. RIP is an open standard protocol that's mean you can configure it among different vendors router. RIP have two versions i.e. version 1 & version 2 (which the most advance & standard version of routing information protocol). On Cisco when you enable RIP, by default its run the version 1 and you manually have to configure the version 2. On the other hand junOS enables the version 2 by default.

Lab details:

Gns3: Gns3 version 1.1.X
VitualBox: 4.2.4 
Cisco IOS: Cisco 7200 series
Junos version=  JunOS Olive 12.1 VM image

Beginner and want to learn about JunOS then you can see how to configure junos on gns3 and Juniper commands.

In our topology we have three router j2, j4 & R1, junos2 & junos4 are juniper routers and R1 is Cisco router.
Lab objective:
Configure RIP on all the routers so that they can communicate with each other.
Lab configurations:
You need to perform the following configurations for achieving the above objective.
JUNOS 2 Configuration:
On JUNOS 2 device, both interfaces em0 and lo0 will be configured for RIP. They will be in the same RIP group called rip-routes.
set interface em0 unit 0 family inet 172.16.1.1/24
set interface lo0 unit 0 family inet 111.0.0.1/32
set protocols rip group rip-routes neighbor em0
set policy-option policy-statement advertise-RIProutes from protocol direct
set policy-option policy-statement advertise-RIProutes from protocol rip
set policy-option policy-statement advertise-RIProutes then accept  

set protocols rip group rip-routes export advertise-RIProutes
 "advertise-RIProutes" is the name of policy for RIP, you can learn more about the configuration of RIP on juniper.

Output of run show configuration | display set on JunOS 2:


JUNOS 4 Configuration:
Similarly you will be configure both interfaces em0 & lo0 for RIP with similar RIP group i.e. rip-routes.
set interface em0 unit 0 family inet 192.168.1.2/24
set interface lo0 unit 0 family inet 222.0.0.1/32
set protocols rip group rip-routes neighbor em0
set policy-option policy-statement advertise-RIProutes from protocol direct
set policy-option policy-statement advertise-RIProutes from protocol rip
set policy-option policy-statement advertise-RIProutes then accept  

set protocols rip group rip-routes export advertise-RIProutes

Output of run show configuration | display set on JunOS 4:

R1 Configuration:
On cisco router you need to advertise both network 192.168.1.0 & 172.16.1.0 In RIP routing

interface FastEthernet0/0
 ip address 172.16.1.2 255.255.255.0
 duplex auto
 speed auto
!
interface FastEthernet0/1
 ip address 192.168.1.1 255.255.255.0
 duplex auto
 speed auto
!
router rip
 version 2
 network 172.16.0.0
 network 192.168.1.0
 no auto-summary

How to test your configurations:
After the correct configuration ping from JunOS2 to 222.0.0.1 should be successful.

Output of Cisco Routing Table:


Output of Routing Table on JunOS 2:


Single area OSPF Configuration in JunOS on GNS3 | Lab Example

$
0
0

How to configure Open Shortest Path First on juniper:

OSPF is an IGP which mean it will route packets within a single autonomous system. OSPF is a link-state routing protocol, OSPF make routing decisions using the SPF algorithm (also known as the Dijkstra algorithm). You can configure OSPF version 2 and version 3 with JunOS. For OSPF configuration on JunOS you need to identify the interfaces that will participate in OSPF. You must enable OSPF on all interfaces within the network on which OSPF traffic is to travel. OSPF uses a router identifier for originating packets from device.  

Lab Details:

Gns3 version= Gns3 1.1
Junos version=  JunOS Olive 12.1 VM image
VM VirtualBox version=  4.2.4 
System OS= Windows 8.1

Lab Tasks:

We have three JunOS routers in our topology, our task is to configure all the routers in same OSPF area 0.
Few commands are required for the configuration of OSPF on juniper but  if you want to explore how to configure IP addresses to JunOS interfaces you can visit IP & static routing on JunOS.

Configuration of OSPF on JunOS2:

login: root
root@% Cli
root > configure
[edit]
root # set interfaces em0 unit 0 family inet address 172.16.1.1/24
root # set protocols ospf area 0.0.0.0 interface em0
root #Commit
Having issue with commit command visit missing mandatory statement'root-authentication'
learn more about the configuration of junos in gns3 you can see how to configure junos on gns3 and Juniper commands.

Configuration of OSPF on JunOS3:


login: root
root@% Cli
root > configure
[edit]
root # set interfaces em0 unit 0 family inet address 172.16.1.2/24
root # set interfaces em1 unit 0 family inet address 192.168.1.1/24
OSPF Configurations commands
root # set protocols ospf area 0.0.0.0 interface em0
root # set protocols ospf area 0.0.0.0 interface em1
root #Commit

Configuration of OSPF on JunOS4:


login: root
root@% Cli
root > configure
[edit]
root # set interfaces em0 unit 0 family inet address 192.168.1.2/24

root # set protocols ospf area 0.0.0.0 interface em0

How to test lab configuration:

You can ping 192.168.1.2 from JunOS2 and it will be successful in case of correct configurations, also find the showroutecommandoutput on JunOS2 which is showing some OSPF routes in routing table.

Other Lab Example : Configuration of RIP on Juniper
End  

Juniper commands | Most basic CLI Commands list for JunOS Router

$
0
0

Most Useful and important JunOS router Commands for Begginer:

This article contain some of most frequent used commands of Juniper devices those are very helpful, especially for beginner those are new to juniper networks.

Before going into Commands details you should know that there are different commands mode on juniper same like Cisco. So you must know about every command where to type it. You can simply differentiate into these modes into 
·         command-line interface (CLI)
·         Configuration mode

How to login into Juniper router:

Simply type user name and password, default username and password for JunOS Olive 12.1 is rootwith no password.
Login: root
password:


How to enter into Command-line interface mode:

After logging into JunOS by your user name and password, you can enter into Command-line interface by typing CLI
root@% cli
root>

How to access configuration mode on Juniper:

You can enter into configuration mode by typing configure in configuration mode.
root> configure
[edit]
root#

How to check current configurations on Juniper:

In cli mode:
root> show configurations

Show configurations with include specific group of commands:

This command will show all the command from configuration starting with "Set"
root> show configurations | display set

How to check all interfaces on Juniper:

You can show all the interface on Juniper with following command:
root# show interfaces

How to see status of specific interface on Juniper:

root# show interfaces <interface name>
Command example:
root# show interfaces em0

How to set the IPv4 address of juniper router:

In Configuration mode you can use the following command:
set interfaces  <interface-name> unit <unit number> family inet <IP address>/mask
Suppose you want to set IP address 22.2.2.2 to interface ge-0/0/2 you can do it like this:
set interfaces ge-0/0/2 unit 0 family inet 22.2.2.2/24

How to set host name on Juniper Router:

root# set system host-name <type-name>

How to set root's password on JunOS:

In configuration mode type the following command for setting password for juniper router.
set system root-authentication plain-text-password

How to save your current configuration on Juniper:

You can use the Commitcommand for saving configuration on Juniper, if you having any issue in save configuration you see error in saving configuration onjuniperfor troubleshooting.
root# commit

How to see the all routes on JunOS:

root> show route

How to setup gateway or static route for Juniper:

Following command will set a static route for network 222.0.0.0/32.
root# set routing-options static route 222.0.0.0/32 next-hop 172.16.1.1

Configure different routing protocols with Juniper:

You can use the set protocols command in configuration mode for configuring different routing protocols on JunOS, some of commands examples are as listed below. But you can see more details regarding each routing protocols with given links or explore more with google.

root # set protocols rip group rip-routes neighbor em0           RIP on JunOS
root # set protocols ospf area 0.0.0.0 interface em0               OSPF on JunOS
root # set protocols isis interface em0


note: All above commands are tested on JunOS 12.1.x

Cisco 2691 Router ios image Download free for GNS3

$
0
0

2600 Series IOS for Gns3:

The Cisco 2600 Series is an modular multiservice access routers, which can provide LAN and WAN solution for small business, and a range of high-performance processors. The wide range of features and interfaces and the flexibility of adding more than 50 modules makes the Cisco 2600 Series the ideal branch-office router for today's and tomorrow's customer requirements.
Ref:www.cisco.com/c/en/us/products/collateral/routers/2600-series-multiservice-platforms/product_data_sheet0900aecd800fa5be.html
Cisco 2691 is one of useful IOS for GNS3, using this image you can create different Network Labs in GNS3. With 2691 IOS image you can use following Ports/slots:
  • Ethernet Slot
  • NM slots | 16 FastEthernet slot
  •  Serial ports or WIC slots

You can Download and install this IOS for GNS3 only. Download 2691 GNS3 IOS for GNS3 from here.

Advantages of GNS3 (Network Simulator) | GNS3 Vs Packet Tracer

$
0
0

Benefits of Using GNS3 workbench:


GNS3 is software use for simulating different virtual devices and real devices like routers, switches etc. It uses Dynamips which is an emulation software to simulate virtual devices.

It has several advantage as compare to Packet Tracer (anther network simulator), some of main features of GNS3 are as under: 

  • Gns3 uses real IOS software to simulate the different virtual devices, so you enjoy the new features of IOS with using new IOS in GNS3. Whereas the Packet Tracer is software base simulator which only allows the limited commands which are programed. Some of new commands may not works with Packet Tracer.
  • One of key advantage of GNS3 is that you can connect the simulated device or network to real world/devices. You can review some of example here. GNS3 Cloud, GNS3 Virtualbox
  • You can take packet capture with Wireshark between devices which you are simulating in GNS3.

  • GNS3 supports devices and IOS of more vendors like Cisco, Juniper, Linux hostetc. as compare to Packet Tracer.
  • The main advantage of GNS3 lies in hardware emulation, since you can connect GNS3 devices to real world therefore you can ping/telnet GNS3 router from anywhere even from over the internet. Even you can configure/control the small office networkwith GNS3 router without using a real router.
  • You can connect and simulate VirtualBox to GNS3and can create some of complex network labs.
  • You can create your network diagram and can represent your network architecture easily.
  • New versions of GNS3 supports IOU devices as well.
  • You can customize virtual devices by adding different slots and Cards like real network devices. 

Cisco Interface and Line Protocol Status description | what are Line Protocol status Down/UP means

$
0
0

Cisco interface status description | Description of Show IP int brief command status:


You can check the Cisco interfaces with command “show ip interface brief”. The interface and line protocol status output gives information related to the physical status of the interfaces, an example of output is as shown above in figure.

When an interface is operating properly, there is only one possible status output. Following are the all possible status of interfaces.

Interface status is up, line protocol is up:

This status shows that interface is OK with physically and configured protocol is also working fine.

Interface status is down, line protocol is down

This state indicates a physical interface problem. The interface may be administratively shut down, a situation that could cause both ends to go down. To bring an interface up, use the no shutdown commandunder the interface configuration mode.

Interface status is  up, line protocol is down

This state means that interface is physically up but there is some protocol mismatch, attributed to a clocking or framing problem.  To resolve this issue you need to check out your protocol/keepalive configurations.

 Interface status is administratively down, line protocol is down

This state indicates interface is shutdown by administrator by using no shutdown command under the interface configuration mode. To bring the interface up, use the no shutdown command under interface configuration mode.

Interface status is up, line protocol is up (looped)

This status shows that a loop exists in the network. This problem could be associated with an existing loopback interface.

Interface status is up, line protocol is down (disabled)


This state often indicates a hardware problem and may be associated with a service provider company problem.

Cisco CLI Password Recovery Steps How to recover the router/switch password if you forget it

$
0
0

How to reset password of Cisco 2600, 3600,7200 series routers

Passwords are often configured on Cisco routers for security purposes and for unauthorized access. This password can be forgotten and you may need to be reset the password to access to the router. The process for recovering a password may varies from platform to platform, but each procedure follows the following basic steps:

Configure the router to boot up without reading the configuration memory (nonvolatile RAM, or NVRAM):


If we forget to enter the privileged mode password, then we'll shut down the router and reboot! Then quickly press [Ctrl + Break] key to interrupt the boot process of the router, it will enter you into rommon mode. This can be done without a password if you are in test system mode.

In this mode set the configuration register to 0x2142, which would make the router does not read NVRAM configuration file at boot time. And then restart the router!
Command is as follows:
rommon 1> confreg 0x2142 // change the configuration register is 0x2142
rommon 3> reset // restart the route or use the command reload


Then reboot the router will go directly to the setup configuration mode, use [Ctrl + C] or answered "n",
Exit setup mode! Then we enter the global mode to reset the password privileged mode.
Command is as follows:
Router> enable // privileged mode
Router # configure terminal // enter the global mode

Router (config) #enable password 1234 // reset the password of command


Cisco Static Routing Lab on GNS3 | Static Routes with GNS3

$
0
0

How to configure the static routes on GNS3

 Static routing is a core technology that any network engineer must understand.  With static Routing you can configure your network without using any dynamic routing protocol like RIP, OSPF etc. Commonly static routes are used for floating routes and a default route. A well designed network should have very few static routes because when you configure a static routes and in case of network changes, you’ll then potentially need to reassess and reconfigure the static route to ensure network connectivity.
With static routes, for successful IP communication it is necessarily you configure bi-directional static routes on each router. Consider the following figure, suppose you want to access R3 from R1, in such case you need two static routes one from R1 to R3 and other R3 to R1.
Static routing configuration is very simple and easy, you just need to advertise the remote network with defining the next hope address. Syntax of static route Cisco command is as under:
Router(config)#ip route <destination network> <mask> <next hope address>
Learn more Basic Cisco commands from here.


In above Gns3 lab you  have three routers on which we will configure routing using static routes. All required configuration are as following, you all also download the full configurations of these routers from links which are given under the configuration of each router.


R1 Configuration:
On router R1 one we have one directly connected network (11.11.11.0/24) and two remote networks 22.22.22.0/24 &  33.33.33.0/24. For static routing you need to configure two static routes for remote network and next hope address will interface f0/0 of R2 which have the IP address 11.11.11.2. Next hope address is like a gateway and IP address of neighbor router which is connected to remote network, if you want to access R3 from R1 you will access it through next hope address 11.11.11.2. 
R1#conf t
R1(config)#interface f0/0
R1(config-if)#ip address 11.11.11.1 255.255.255.0
R1(config-if)#no shut
R1(config-if)#exit
R1(config)#ip route 22.22.22.0 255.255.255.0 11.11.11.2
R1(config)#ip route 33.33.33.0 255.255.255.0 11.11.11.2
Download R1 configuration
R2 Configuration:
On router R2 we have two directly connected network 22.22.22.0/24 &  11.11.11.0/24 and remote network 33.33.33.0/24. Therefore you need to configure the only static route for 33.33.33.0/24 with next hope address 22.22.22.2.

R2#configure terminal
R2(config)#interface f0/0
R2(config-if)#ip address 11.11.11.2 255.255.255.0
R2(config-if)#no shutdown
R2(config-if)#exit
R2(config)#interface f1/0
R2(config-if)#ip address 22.22.22.1 255.255.255.0
R2(config-if)#no shutdown
R2(config-if)#exit
R2(config)#ip route 33.33.33.0 255.255.255.0 22.22.22.2
R2(config)#exit
R3 Configuration
Remote Network=11.11.11.0/24
Directly connected networks=22.22.22.0/24 &  33.33.33.0/24
Next hope address= 22.22.22.1

R3#configure terminal
R3(config)#interface f0/0
R3(config-if)#ip address 22.22.22.2 255.255.255.0
R3(config-if)#no shutdown
R3(config-if)#exit
R3(config)#interface loopback 1
R3(config-if)#ip address 33.33.33.1 255.255.255.0
R3(config-if)#no shutdown
R3(config-if)#exit
R3(config)#ip route 11.11.11.0 255.255.255.0 22.22.22.1
R3(config)#exit

Download R3 configuration

After the successful configuration show ip route on R1 will have the following output.


Cisco Basic Commands list for beginners | Cisco command levels EXEC Modes

$
0
0

Cisco IOS command level and their Basic Commands:

This article has basic Cisco commands, for more commands and details you can visit Cisco.com.

What are Cisco command levels EXEC Mode and how to access them:

With Cisco command levels EXEC Mode you can control user privileges. These user privilege controls can be given through password.  There are three command levels in all Cisco IOS devices. In each command level you have specific privileges and control. These commands Level are as under:
  •  User Mode
  • Privileged EXEC  Mode
  • Global configuration Mode

Cisco User Mode Cisco:

In user EXEC mode you can execute limited array of show commands, basic reachability tests, such as ping and traceroute, as well as other ways of viewing configurations and status info of a Cisco device without the ability to make changes. This command level is represented by symbol “>”, by using command you can “enable” you can go to next mode i.e. privileged EXEC mode.

Cisco Privileged EXEC Mode

Privileged EXEC mode is represented by symbol “#”.

This mode is for users that have been some admin privileges and need to make changes, but in this mode most of commands are related to view/show configurations and debugs.
In privileged EXEC Mode most of command show the status of cisco devices, module and startup, running configurations and configurations of different protocols.

Cisco Global Configuration Mode

This mode is for administrator and power user, from this mode you can configure your Cisco device can configure different Protocols. Some of common commands for configurations of this mode are as under.

You can access or go to global configuration mode by using command “configure terminal” when you are in Privileged EXEC mode.
R1>
R1>enable                                         Entering into Privileged EXEC Mode
R1#configure terminal                   Entering into Global Configuration Mode
R1(config)#

Note: In this article all Cisco commands are represented with purple color.

Example of Commands in Privileged EXEC Mode:

How to Check the IOS/hardware version of Cisco Device:

R1#Show Version 
Show version command will displays the configuration of the system hardware, the IOS version, and the names and sources of configuration files and the boot images. This command also displays information about how the system was last started and how long the router has been running since that start.

How to check all running configurations of Cisco Device:

Show running-config
This command will show all the configuration which are configure on Cisco device. You view output of show running-config

How to check the vlan details on Cisco:

Show Vlan
Click here to see the Outputof show vlan

How to check detail of specific interfaces on Cisco:

Show interface <interface name>
Command Example: show interface f0/0 (this command will show the detail of interface fastEthernet 0/0) 

How to check syslog errors:

show logging
show logging command displays the state of syslog error and event logging, including host addresses, and whether console logging is enabled. View output of show logging

How to check running process on Cisco Device:

show Processes 
This command will displays information about the active processes.

How to check the memory used by running process on Cisco:

show Processes memory
This command will displays the amount of memory used. See
output of Show processes memory.

How to check Routing table on Cisco Router/Switch:

show ip route
Above command will show all dynamic and static routes on Cisco Device. A output of show ip route.
show ip route OSPF
Command will show all OSPF routes.
show ip route RIP
Command will show all RIP routes.
Show ip route EIGRP
This command will show all EIGRP routes.

How to check all interfaces details:

show interfaces
This command displays statistics for the network interfaces. Output of this command include following details
         i.            UP/down state of interface
       ii.            MAC Address
      iii.            IP address
     iv.            MTU ,BW Delay, duplex type of interfaces
       v.            Queueing strategy
     vi.            Packet send/received
Click here to see the Outputof show interfaces

How to check the status of all interfaces on Cisco:

Show ip interface Brief
This command will show you the IP addresses, interfaces status (up/down), protocol status (up/down), you can view output of Show ip interface Brieffrom here.

Check neighbors detail and routing information | Cisco CDP commands    

 show cdp interface   
  show cdp neighbors [Detail]   
  show cdp entry Router 
 Ip domain-Lookup nsap    
 Show hosts    

Some other Examples of show commands:

Following are some others show command which are self-explanatory you can try these command on your Cisco device and view their output.
Show clock
Show controllers
Show mac-address-table 
Show memory
Show privilege
Show protocols
Show startup-config
Show Flash 
Show spanning-tree


Examples of Global configuration Commands:

 To enter in Global configuration mode type: config terminal. Global configuration mode is often used to configure the network Commands.

Set hostname of Router:

Router(config)#hostname <distinguished name>
Command Example: Router (config)# hostname R1 (This command will set the router name to R1)

How to set banner message:

banner motd <banner start identification> banner message <banner end identification>
Command Example:
banner motd #Unauthorized access to this device is prohibited!#    
Above command with set the banner to "Unauthorized access to this device is prohibited" 

How to set IP address to Cisco interface:

Router(config)#  Interface <port number >
Router(config-int)# ip address <ip address number>
IP address Command Example:
 Router(config)#interface f0/0
Router(config)# ip address 176.16.32.1 255.255.255.0
(This will set the IP address 176.16.32.1/24 to interface f0/0)
How to up/on the Cisco router interface:
Router(config)#interface f0/0
Router(config-int)# no shutdown 
(above command will change the status of interface fo/o to active/up/ON)

How to set the interface speed:

Interface console type the following commands for configuring interface speed.
switch(config-if)# speed{10|100|auto

R1(config)#interface f0/1
R1(config-if)#speed 100
Above commands will configure the speed of 100MBs to interface f0/1.

How to set enable password on Cisco:

Router(config)#  Enable Password <password>
Enable password Command Example:
 Router(config)# Enable Password Cisco
(This will Establishes a enable password to Cisco)

How to set Telnet password on Cisco:

Router(config)#line vty 0 4
Router(config-line)#login
Router(config-line)#password cisco
(Above command will create a Telnet password to Cisco)

Cisco IP routing Commands:

How to set the static routing:   
Router(config-router)#ip route [destination_network] [mask] [next-hop_address
Static route command example:
Router(config-router)#ip route 210.22.22.2 255.255.255.0 192.168.0.1
Above command will set a static route for network 210.22.22.0. See static routing on gns3.

How to set the default route on Cisco Router    

Router(config)#ip default-network< network number >   
Command Example:ip default-network 192.168.1.1

How to configure dynamic routing with Rip on Cisco:

Router(config)#Router rip    
Router(config-router)#Network <Network ID> 
Router(config-router)#Network 192.168.1.0
See more for configuration command example of RIP in Cisco from here.  

How to configure OSPF on Cisco:

Router(config)#Router ospf process ID
Router(config-router)#Network <Network ID> <mask> area <area ID>

Router(config)#Router ospf 1
Router(config-router)#network 10.0.0.0 0.0.0.255 area 0
Above command will advertise the network 10.0.0.0/24 in area 0.

How to configure access-list on Cisco:

Access-List <access number> {permit | deny}  <IP address to block>

for more details Access list in Cisco

Cisco Switching Commands:

How to crate Vlan on Cisco: 
switch(vlan)# vlan <vlan-num> name <vlan name>
 switch(vlan)# vlan 10 name marking
Above command will create vlan 10 with name marketing.
How to set access port: 
switch# configure teriminal 
switch( config)# interface fo/o
 switch(config-if)# switchport mode access 

How to assign vlan to interface in Cisco:
switch( config)# interface <interface name/number>
switch(config-if)# switchport access vlan <vlan-num> 
 Command Example:
switch( config)# interface  f0/0
switch(config-if)# switchport access vlan 10
Above command will add interface f0/0 to vlan 10.

 How to create trunk port: 

After selecting the interface mode type the following commad.
switch(config-if)# switchport mode trunk 

How to allow the specific Vlans on Trunk Port:

switch(config-if)# switchport trunk allowed vlan < vlan-list>


Cisco Daily used commands:

Cisco Connectivity Test Commands:

Ping host name / IP address    
R1> ping 10.0.0.1
traceroutehostname / IP address of destination
R1# traceroute 192.168.1.1

How to go back to previous command level: (From Global Configuration to privileged EXEC or User  mode):
1.       You can use command “Exit” or “end” for exiting the current EXEC mode, but if you want to go back to privileged EXEC  Mode from any mode simple hit the “Ctrl+Z” from keyboard.


In this article I have combine some of common and basic commands, if you think that there are some basic/important commands are missing here then please comment & I will update it accordingly. Thank you for reading it.

GNS3 Tutorials for beginners | How to getting start with GNS3

$
0
0
GNS3 is one of the famous software for simulating the network devices. It is important for a networks Engineer or networks profession that he can create and simulate different network scenarios using GNS3.


This article is divided into different sections and design for both beginners and advance level GNS3 users.

GNS3 Tutorial for begginers:

If you are newer to GNS3 you can start working on GNS3 with the following tutorials:


GNS3 Labs & Tutorials

Following are some network labs that you can create with GNS3.

Cisco Route filtering


Use Juniper on GNS3

GNS3 Tutorials for CCNA:

Following are some gns3 labs which are useful for CCNA preparation.


Basic OSPF configruations


GNS3 video tutorials

Create Vlan with GNS3


Gns3 installation on ubuntu 


CCDA Intro freeTraining and tutorials 


GNS3 Gerneral issue and troubleshooting:


DHCP lab in GNS3 | How to Configure DHCP on Cisco Router

$
0
0

Cisco DHCP Configuration | How to assign automatic IP address from Cisco Router:

In this article I will show you how to configure and enable DHCP (Dynamic Host Configuration Protocol) on Gns3 router. For this lab I have Create the following lab in which I have configure a router (DHCP Server) as DHCP server where as I used the two DHCP clients which will obtain the IP address automatically from DHCP server. These DHCP clients include a router (which is configured like a PC) and a VM machine.  You can visit How to connect windows VM to Gns3& installation of windows 10 on Virtualbox for more detail.


Following configuration are required for making the Router as DHCP server.

DHCP server (R1) Configuration:
R1#enable
R1#Configure t
R1 config)#ip dhcp pool ipranges
R1(dhcp-config)# network 100.1.11.0 255.255.255.0
R1(dhcp-config)#dns server 100.1.11.1
 R1(dhcp-config)#default-router 100.1.11.1
R1(dhcp-config)#lease 10 (this command will set the IP lease for 10 day, view more Cisco Commands)

How to exclude the IP addresses from DHCP range


R1(dhcp-config)#ip dhcp excluded-addresses 100.1.11.20 100.1.11.31

Following are the configuration required on router which will act as DHCP client.

PC2 Configuration:
PC2#enable
PC2#Configure t
PC21#no ip routing
PC2#inf f0/0
PC2#ip address dhcp
 PC2#no shutdown

VM win 10 DHCP client configurations:

Simple power on the VM host in DHCP and set the network adapter setting to obtain the IP automatically. Check the following images:


How to test DHCP configurations:

On DHCP server use the following command for confirming DHCP configurations
show ip dhcp binding
Following will be the output in our case.


Other command that you can use is:
show DHCP neighbor.

Vm Windows 10 is not accessible from GNS3 Problem with Virtual Machine is not getting IP from DHCP in GNS3

$
0
0

How to Connect Windows 10 Virtual Machine with GNS3 1.3.9:

You can see the following Video for connecting VM to router in GNS3:


If you are having difficulty while connecting a VM to GNS3 you may check the following:


1. Open the VirtualBox, goto adapter setting and select 'Not attached' 
2. If the ping from router to VM machine is not successful then turn off windows 10 firewall.
3. if you want to give the IP address to VM via DHCP configured on gns3 router then make sure you have disable all other DHCP in the network.


In case of any issue, you can ask question in comment.

How to Open a .DMG File on MAC OS X

$
0
0

How to Open a DMG File in Mac

A .dmg file is an Apple’s Disk Image file or a copy of a CD or DVD which is combined in one file. The OS deals this file like a physical disk. Normally OS X will automatically mount a .dmg file when you double click it, however should this fail you can manually mount an image using tools that come with the operating system.

Steps for opening a .DMG file:


  1. Double Click on .dmg file, a new windows will be open.


2. Now drag the file from left icon to applications, it will automatically open the your DMG file.

3. Similarly you can add your DMG file into applications from GO/Applications, open applications and then drag file into application. 


It will mount your DMG file.


Alternative method for open .dmg file on MAC X:

1.      Click on "Disk Utility" from your Applications list as mention above from GO/Application. It should be in a folder called Utilities.
2.      Click "Mount" from top and select the .dmg file you want to open. Once mounted it will appear on your desktop as an icon.

3.      Double-clickon the icon (appear in left side) to open it.

How to eject DMG file:

You can eject the .DMG file in different ways:

1. Right click on mount file and then click on Eject.


2. Go to desktop device and then click on little arrow for ejecting .dmg file.


Fixed: Unable to create generic Ethernet NIO Gns3 Cloud issue on Windows 7 or 8.1

$
0
0

Cloud NIC adapter is not working on GNS3:

Gns3 Shows this error when you try to connect router to gns3-Cloud. Cloud node is used for connecting Physical, Microsoft loopback or virtual interface to gns3. Currently there is not exact description for this error message but normally this is happen when your NIC is not initialized correctly.  

How to resolved  ” Unable to create generic Ethernet NIO”:


Complete error messageServer error [-3200] from 127.0.0.1:8000: SW1: unable to create generic ethernet NIO
OS= windows 7 32bits (Same was reported on 64 bits windows 7 & 8.1)

You can resolved or troubleshoot this error very easily in GNS3 by following the given steps. It may possible that you issue may get resolved by trying first step and you need not to go further in troubleshooting. Here are the steps for resolving this problem in gns3.
1.    Disabled and Enable the network connection associated with gns3-cloud. For this type “ncpa.cpl” in run, this will show you all NIC setting. Right click on your required one & then Disabled and Enable.
2.       Turn off the windows Firewall and check it again in GNS3.
3.       Reboot your computer. (In most cases restart works for this issue)
4.       If after the reboot you still have the same issue then check out your antivirus setting. Temporary disable your AV and check GNS3 again.

If you still have the same issue even after trying above step then please share your experience in comments. Thank you..!

What is a Cisco Access Server and how we can use terminal server with GNS3 1.1 on Windows 8.1

$
0
0

Configure Access Sever in GNS3 1.3.11:

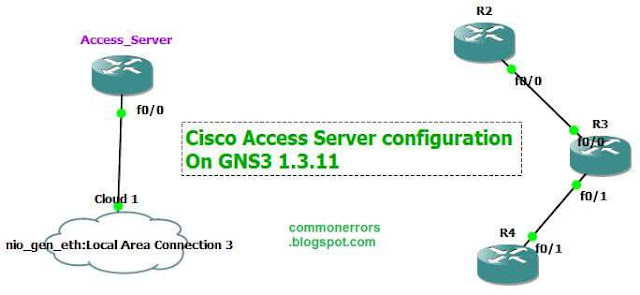
Cisco access server is used to configure and manage different routers from one centralize location or from single console. Sometimes, when you have many routers in your network or topology, it is a little annoying to deal with huge number of consoles or opened terminals. Similarly working in a real Lab environment it is also difficult to change the console cable from one router to another for configuration. To resolve this hurdle Cisco access server or terminal server is best option for you. Using Cisco access server you can configure all routers in your network topology using single console terminal and without change your console cable. When you access server is configure you can simple switch or jump to another router in your network topology by pressing  Ctrl+shift+6+X from your keyboard.
Normally we use Cisco 2511 router for access server and which has several config cables coming out from a single port. All other cables can be connected to different routers in your lab.
But you can also use any other routers and cables layout as per your requirement, here we configure access server in gns3 therefore we don't required any cable and all topology and configuration will be created in Gns3.


Gns3 Labs Details:
Gns3 version:Gns3 1.1
OS version: Windows 8.1 Pro
IOS version: Cisco 3600 Series IOS or Cisco 2900 series gns3 ios

In our Gns3 topology we have four routers R1,R2,R3 and R4. We will configured R1 with Cloud as access_server from which we can configure all the router from its console. For this purpose you need to create an virtual network adapter, i am using Microsoft loop-back adapter for this purpose. We can create and configure the Microsoft loop-back adapter by following steps:
Open device manager: Right click on my computer and then click on Manage. Now right click on top and click on add legacy hardware for create MS loop-back adapter. 


Then Click next and select the option "install the hardware that i manually select from list
From devices list select the network adapter and click next:
Now from list choose Microsoft and then Microsoft KM-Test loopback adapter and click next and then finish.
Once you finished you will find  a network adapter in your network connection, assign any IP address of any class. Here i have assigned 11.11.11.1 with subnet-mask of 255.255.255.0. 
Now open your GNS3 then  from GNS3 Preferences> Gns3 servers> Local Server tab and choose the IP address of your MS loopback adapter (in our case it is 11.11.11.1) or make sure "Allow console connections to any IP address" is checked.
Now drag the cloud from gns3 devices and configure it with Microsoft loopback adapter.
You may got the error unable to create generic ethernet while connecting cloud to gns3, for troubleshooting you can click on link.

Cisco Configuration of access server for R1:

Open the R1 and perform the following configurations:
R1(config)#hostname Access_Server
Access_Server(config)#int f0/0 

Access_Server(config-if)#ip address 11.11.11.2 255.255.255.0
Access_Server(config-if)#no shut
Access_Server(config)#ip host R2 2002 11.11.11.1
Access_Server(config)#ip host R3 2003 11.11.11.1

Access_Server(config)#ip host R4 2004 11.11.11.1

Where 2002, 2003 and 2004 are console port numbers for R2, R3 and R4 respectively, you can find it by right clicking on router and then click on "change console port" .

How to Switch to other routers from access server

Once you have completed the above configuration you can switch to routers by following two ways:
  • By pressing Ctrl+shift+6+X
  • by typing router name in enable mode like "Access_Server#R3" for switching to R3 router.

Viewing all 113 articles
Browse latest View live